Setting up the raspberry pi
This page will explain how to set up the Pixy with the Raspberry Pi.
Powering The Pi
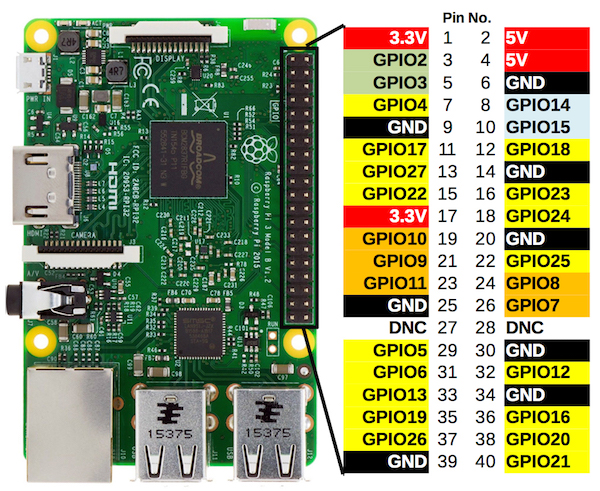
Plug in the jumper wires into pins 4 and 6, with the red wire into 4 and the black wire into 6. Make sure to give the Raspberry Pi at LEAST 2 amps at 5 volts. Anything lower, and you might experience unnatural behavior of the Pi and a possible unexpected shutdown. Also, make sure to NOT give it 12 volts through the pins as this will instantly burn out the Pi. It will be dead forever.
Enabling WiFi on the Pi
First you need to edit the blacklist file. Use sudo nano /etc/modprode.d/raspi-blacklist.conf. Make sure your file system is set to read and write. For this use sudo mount -o rw, remount /. After you have opened the file, comment out every line of code by typing a # at the beginning of every line. After that is done, use Ctrl+X to exit. When it asks, press y, and press enter. After you are in the CLI, reboot the Pi by typing sudo reboot
Connecting the Pixy
Even simpler, just take the USB Micro-B to USB-A cable that came bundled with the Pixy2Cam and plug it in to one of the USB ports on the Raspberry Pi. You will need to install some other software to make it actually have an image feed working and things like that which will be talked about later in this guide.
Software
Setting up the software for the Raspberry Pi is very straightforward. Instructions on how to do that can be found here.
The Raspberry Pi should be located at 10.25.30.5, a static IP. If it isn't, fix that.
Setting up the Pixy2 on the software side is a little more complicated. Instructions for installing pixymon on linux can be found here. For Mac OS X here, and for Windows click here. This is a direct download link however. Just run the exe and you should be up and running in no time.
Instructions for installing libpixyusb on linux can be found here. To build the python code examples, click here for the tutorial.